Genealogy Software Comparison, Part 4b: More on Census Records – FTM

In the earlier post on RootsMagic (RM), I described the process to enter the transcription and image of a census record to its source citation.  I also l looked at how to share the census fact and source citation with the other family members included in the census record.  Today’s post will look at those same features in Family Tree Maker (FTM).

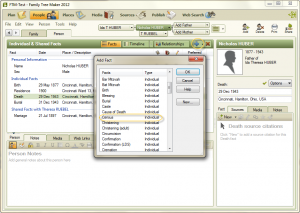
I added a census fact to Nicholas Huber in my tree by going to the Person tab in the People workspace and then clicking on the blue plus sign to add the fact.

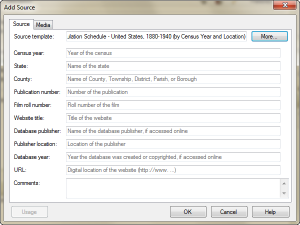
I added the source citation following the process described in the earlier post Citing a Census Source – FTM.  The resulting Source Details are shown below.
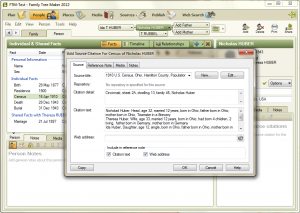
I clicked on the “Resource Notes” tab and entered the information transcribed from the census record.  Next I went to the “Media” tab to link the census image.
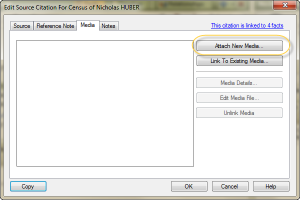
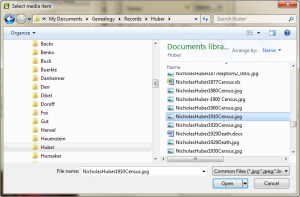
I clicked on the “Attach New Media” button.  (If I had previously attached this census image to a source or individual in my FTM database, I would have clicked on the “Link to Existing Media” button.)  The “Select a Media Item” window allowed me to select the correct file from my hard drive.

Then, the “Copy to Media Folder” window appeared.
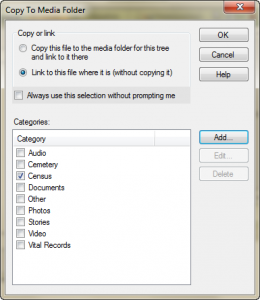
To save space in my FTM database (and thus on my hard drive), I chose the option to “Link to this file where it is (without copying it).”  I selected the “Census” category and then “OK.”  The Media Detail window allowed me to add a Caption, Date and Description to the image as well as to change the Category and mark the image Private.
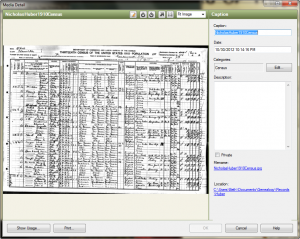
After entering the desired data and clicking “OK” I now had my source citation with transcription and image of the source record.  Now, I wanted to attach all of this to the other three members of the family who appeared in this census record.

I searched all around on Nicholas’ Person tab (in the People workspace) trying to find the button or icon that would allow me to copy his 1910 census fact and source.  I couldn’t find any.  I looked unsuccessfully in the Companion Guide, the electronic book that comes with the software.  Next, I went to the Online Help Center and accessed the Knowledge Base.  I typed “copy fact” into the search box and saw several articles related to facts and to making backup copies of the database.  I started reading through all the articles and finally found what I was looking for in the article “Add, edit or delete a fact in Family Tree Maker.”  I followed the instructions very carefully and successfully copied the fact and source citation from one family member to the other three.  Here are the steps.

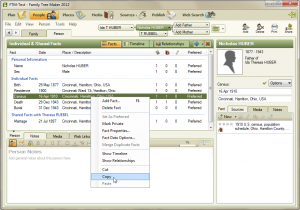
I went to the Person tab on the People workspace and right clicked on the fact for the 1910 census that I wanted to copy and selected “Copy.”

Then, I right clicked again on the same fact and selected “Paste.”   The “Paste Fact” window appeared and displayed Nicholas and his family members.
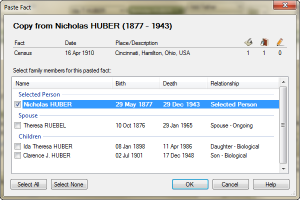
I selected the people to whom I wanted to copy the fact and source citation, namely Theresa, Ida and Clarence and I deselected Nicholas.
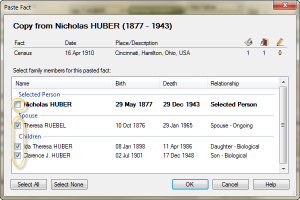
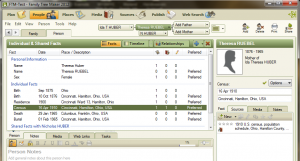
I read in the knowledge base that it is important to deselect the original person from whom the fact is copied.  Failure to do so will result in a duplicate fact being created for this person.  After I clicked “OK” to complete the copy/paste, I checked the facts for Theresa, Ida, and Clarence and saw they now had the 1910 census fact and the source citation.
In FTM, the process to add the image and transcription to a source citation was easy enough to do.  The screen flow was intuitive.  Copying the fact and source citation from one individual to others was somewhat more difficult.  It was not clear at first how to accomplish the operation.  Having to deselect the person whose fact was being copied in order to prevent undesired duplicates seems to indicate a poorly designed feature.  In the end, I managed to do what I wanted to do, but the procedure seemed too complicated.

The URL for this post is: http://www.bnk94.com/groupwgenealogy/2012/11/01/genealogy-software-comparison-part-4b-more-on-census-records-ftm/

Copyright (c) 2012, Beth Weiland Benko

Genealogy Software Comparison, Part 3d: Citing a Census Source – Summary

In the last few posts, I have reviewed adding a census source citation in RootsMagic (RM), Family Tree Maker (FTM), and Legacy Family Tree (LFT).  I will give a summary of my experiences below.

In order to provide a thorough analysis of each program’s capabilities, I am going to take a somewhat scholarly approach to the task of developing source citations.  First, it is necessary to clearly state some definitions.  Elizabeth Shown Mills has published single page quick sheet that summarizes the research process and defines the relevant terms.

SOURCES:  Artifacts or books, digital files, documents, films, people, recordings, websites, etc.

INFORMATION: Statements or raw data offered by a source.

EVIDENCE: INFORMATION that is relevant to the research problem.

SOURCES provide INFORMATION from which we select EVIDENCE for ANALYSIS.1

A Citation is a reference to the source, with details (e.g. page number). ”Citations are statements in which we identify our source or sources for a particular assertion.”  Citations appear in Source Lists (bibliographies) and in Reference Notes, either as footnotes or endnotes.  Each citation type has a specific format.2

All three programs use the concept of a master source and source detail (RM and LFT).  FTM uses the terms source and citation detail, but it is the same idea. This concept was very confusing to me the first time that I encountered it.  How does one know where the dividing line is between the master source and the source detail?

The answer is easy in the case of a book:  the source detail is the page number and everything else (author, title, publisher, etc.) is part of the master source.  Census records are a bit more complicated.  It is easy to assume that the year and type of census (e.g. “1920 United States Federal Census”) should be part of the master source and that sheet and page number, dwelling number, family number and person’s name should be in the source detail.  What about city/township, county, state and enumeration district?  I struggled with this for a while.

RootsMagic provides an excellent explanation of this concept in their free, online webinar:  “Sources, Citations and Documentation with RootsMagic” at http://files.rootsmagic.com/webinars/2011-02-04-Sources-Citations-and-Documentation-with-RootsMagic.mp4.  I recommend it for anyone who seeks clarity on this issue.

In each of the three programs, I entered a census “fact” or “event” for my grandparents using the 1920 census as my source.  I used a template in each program to construct a citation.  I compared the citation that each software program produced to a citation I built “by hand” using Evidence Explained as my reference.  Here are the results.

Family Tree Maker

1920 U.S. census, population schedule, Ohio, Hamilton County, Cincinnati, Ward 9, enumeration district (ED) 163, p. 232,  sheet 4A, dwelling 51, family 83, Ida T. Ulrich; NARA microfilm publication T625, roll 1390; digital image, Ancestry.com (http://www.ancestry.com).

RootsMagic

1920 U.S. census, Hamilton County, Ohio, population schedule, Cincinnati, Ward 9, enumeration district (ED) 163, p. 232 (stamped), sheet 4A, dwelling 51, family 83, Ida T. Ulrich; digital images, Ancestry.com (http://www.ancestry.com : accessed 17 September 2012); National Archives microfilm publication T625, roll 1390.

Legacy Family Tree

1920 U.S. census, Hamilton Co., Ohio, population schedule, Cincinnati, Ward 9, enumeration district (ED) 163, sheet 4A, p. 232 (stamped), dwelling 51, family 83, Ida T. Ulrich; digital images, Ancestry.com (http://www.ancestry.com : accessed 1 Oct 2012); citing National Archives and Records Administration microfilm T625, roll 1390.

Citation based on Evidence Explained3

1920 U.S. census, Hamilton County, Ohio, population schedule, Cincinnati, Ward 9, Enumeration District (ED) 163, p. 232 (stamped), sheet 4A, dwelling 51, family 83, Ida T. Ulrich; digital image, Ancestry.com (http://www.ancestry.com : accessed 1 October 2012); citing National Archives microfilm publication T625, roll 1390.

Conclusion

RM and LFT provided individual fields for each piece of data contained in the details of the citation.  Each field had help text to guide the user.  The citation produced by RM was identical to the citation I constructed by hand.  The LFT citation differed one small detail: sheet number was before page number instead of the other way around.  Both RM and LFT produce a Reference Note and Source List (bibliography) form of the citation.

FTM did not give field-by-field data entry for the detailed information.  It provided a single free-form text box for data entry along with help text enumerating the information to be entered.  This method puts added burden on the user to enter all the correct data.  In addition to being more prone to data entry errors, the resulting citation does not closely match the citation prescribed by Evidence Explained.  FTM produces only a Reference Note citation and not a Source List (or bibliography) form.

Based on my experience, the winner in the census record source citation category is RootsMagic, followed closely by Legacy Family Tree.  Family Tree Maker was a distant third as judged on ease of data entry and composition of the resulting citation.


1Elizabeth Shown Mills, Evidence Analysis: A Process Map; digital image at Historic Pathways (http://www.HistoricPathways.com : 10 October 2012.

2Elizabeth Shown Mills, Evidence Explained: Citing History Sources from Artifacts to Cyberspace, (Baltimore: Genealogical Publishing Co., 2007), 42-43.

3Ibid, 240.

Genealogy Software Comparison, Part 3b: Citing a Census Source – FTM

In preparation for delivering some help sessions at my local genealogical society, I am working to become proficient in three genealogy applications:  Family Tree Maker (FTM), RootsMagic  (RM) and Legacy Family Tree (LFT).  I will be using various features of each package and blogging about my experiences.  The “Part 3” posts will look at adding a source citation for a census record.  I will use RM in Part 3a; FTM in Part 3b; and LFT in Part 3c.  If you’d like to start at the beginning, the first post in the series is:  Genealogy Software Comparison.

In the Person tab of the People Workspace, I clicked the plus sign to add the census fact to my grandma Ida.

FTM Add Census Fact

I entered the date and place of the census in the spaces provided.  Then, I added the source information, a “new” source.  On the “Add Source Citation For Census For <person>” screen, I clicked on the “New…” button to display the “Add Source” screen.

FTM - Add Source

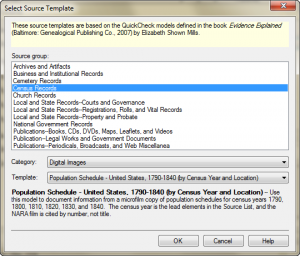
I was a bit confused about what to do next until I clicked on the “More” button to display the “Select Source Template” screen.

FTM - Select Source Template

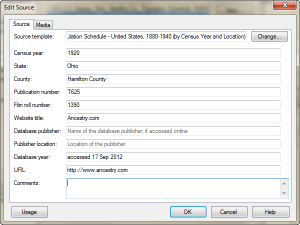
On that screen, I selected “Census Records” Source group, “Digital Images” Category and “Population Schedule – Untied States, 1790-1840 (by Census Year and Location)” template.  After clicking on “OK” I saw the following “Add Source” screen with appropriately labeled fields to fill in for my census citation.

FTM - Add Source

I completed this form and clicked OK again.  The “Add Source” window closed revealing the “Add Source Citation for Census for <person>” screen again.

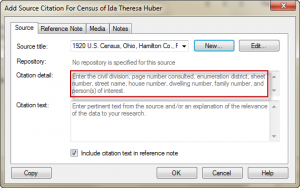
FTM - Add Source Citation for Census

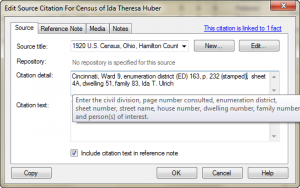
The Source title field was filled in with the information I had entered on the previous screen, i.e. “1920 U.S. Census, Ohio, Hamilton Co., …”   The citation detail box contained a daunting set of instructions for data to be entered there.  Luckily, the information was available in a tool tip as I typed in that text box.

FTM - Edit Source CitatioThe text box for entry of the citation details was not as user friendly as having the individual fields displayed.  This would also have given the program the opportunity to provide help for each field.  I would have expected the template to walk the user through the data entry field by field.  To see the source citation that the software builds, a user must go to the Reference Notes tab. The resulting source citation contained of the necessary elements, but was not exactly in the form prescribed in Evidence Explained [1].

FTM:  1920 U.S. census, population schedule, Ohio, Hamilton County, Cincinnati, Ward 9, enumeration district (ED) 163, p. 232 (stamped),  sheet 4A, dwelling 51, family 83, Ida T. Ulrich; NARA microfilm publication T625, roll 1390; digital image, Ancestry.com (http://www.ancestry.com).

EE: 1920 U.S. census, Hamilton County, Ohio, population schedule, Cincinnati, Ward 9, Enumeration District (ED) 163, p. 232 (stamped), sheet 4A, dwelling 51, family 83, Ida T. Ulrich; digital image, Ancestry.com (http://www.ancestry.com : accessed 17 September 2012); citing National Archives microfilm publication T625, roll 1390.

[1] Elizabeth Shown Mills, Evidence Explained: Citing History Sources from Artifacts to Cyberspace (Baltimore, Maryland: Genealogical Publishing Co., 2007), 240.

Genealogy Software Comparison, Part 2b: Starting a Family Tree – FTM

In preparation for delivering some help sessions at my local genealogical society, I am working to become proficient in three genealogy applications:  Family Tree Maker (FTM), RootsMagic  (RM) and Legacy Family Tree (LFT).   I used an early version of FTM in the late 90’s and I’ve been a user of LFT since 2008.  RM is completely new to me.   RootsMagic and Legacy FamilyTree offer a free version of their software with a limited set of features.  Since FTM does not have a similar free option, I decided to use the paid versions of each software package. This series of blogs will document my impressions of and experiences with these three software packages.

In this post I will review creating a family tree file and entering a bit of data in Family Tree Maker.  I entered a snippet of the maternal side of my family tree:  my grandmother, her husband and her parents.  For each person, I entered dates and places for birth, marriage, death and burial.

Family Tree Maker, version 21.0.0.580 – www.familytreemaker.com

I started the program and chose the “Enter what you know” option.  I entered Ida’s name.  After I entered her last name, the program automatically put that name into the “New tree name” field.  Since that was not what I wanted, I was glad that it allowed me to change the database name as well as select the location where the file would be stored.   A place names lists is already populated (similar to what I had seen on Ancestry.com), so the first time I began to type Cincinnati, there was a list that I could select from.  Subsequently, the list just contained the place names I had entered.

The workflow of FTM encouraged me to enter parents’ names before I entered any additional detailed information for Grandma Ida.

FTM New Tree

After I entered information on the initial screen, I was given the option to allow Family Tree Maker to search Ancestry[.com] automatically.  I chose “No.”  After I clicked on “OK” the following screen came up, where I was able to enter death and marriage information for Ida.

The Custom View button near the bottom of the screen allowed me to add the fields for Burial information to this initial data entry screen.

Entering the cemetery name after the city resulted in an error icon after the burial place name, so I removed the cemetery name from the location field.  I did not see a way to attach the name of the cemetery to the burial event.

Entering the additional detailed information for Ida’s parents and husband was simple and intuitive.  The family tree view made it easy to navigate from one person to another.  Since I’ve been a user of Ancestry.com for several years and FTM bears a strong resemblance to that web site, the user interface feels very familiar.

Here is a summary of the information entered.


Summary

Family Tree Maker was easy to use for initial data entry.  The screens were very intuitive.  I never had to search around for how to enter the next person’s information.  One possible disappointment is the lack of a place to enter cemetery information on the burial event.

Next time:  Data entry in Legacy Family Tree