Legacy Family Tree 8 Source Citation for an Ancestry.com Public Member Tree

There have been several blog posts written lately about how to properly cite an Ancestry.com Public Member Tree using two of the more popular genealogy database programs, Family Tree Maker 2014 and RootsMagic.

Russ Worthington started the discussion with Family Tree Maker and Ancestry Family Trees. Next, he engaged Elizabeth Shown Mills in the discussion Citing of an Ancestry Member Tree.The editor of the Evidence Explained Blog gave the following as a properly formed citation for this type of source:

1. “Public Member Trees,” database, Ancestry.com (http://www.ancestry.com : accessed 4 April 2014), “Cowan Mulliner Woodruff Kerr” family tree by Crista Cowan, profile for Richard Ridgway (1679-1718, d. Bucks, New Jersey) undocumented data updated March 2014.1

Russ had two follow up posts: FTM2014 and Ancestry Member Trees – An Update and FTM2014 and ancestry Member Trees – What Next?

Randy Seaver wrote RootsMagic 6 Source Citation for an ancestry.com Public Member Tree.

I am going to take a stab at citing such a source using Legacy Family Tree 8, using data from my own research.

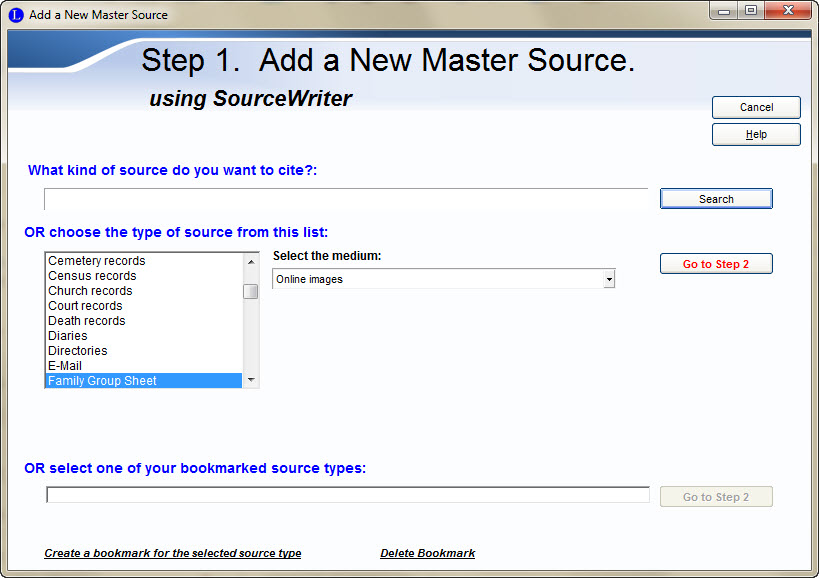
First, I looked for a Master Source in the SourceWriter of the appropriate type for an Ancestry.com Public Member Tree. The “Family Group Sheet” seemed to match what I needed. I selected “Online images” for the medium.

SelectMasterSource
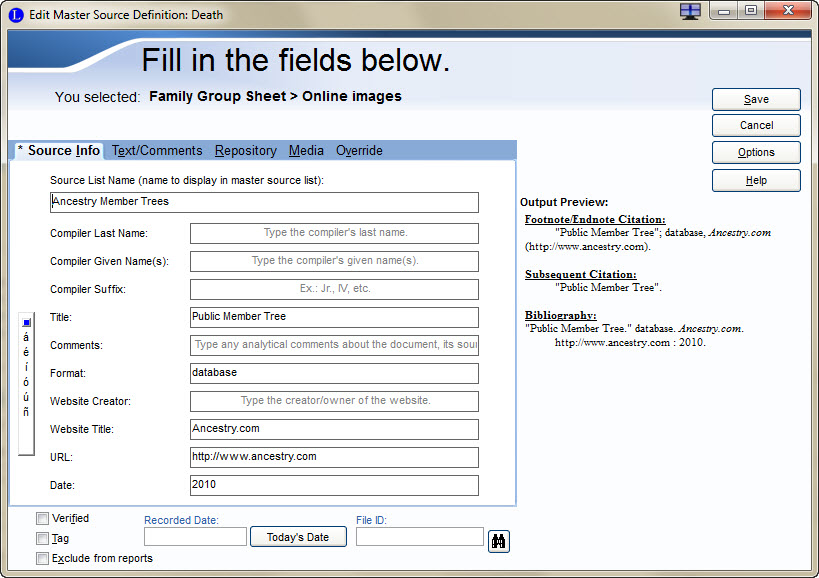
Next, I filled in fields for the Master Source.

FamilyGroupMasterSource
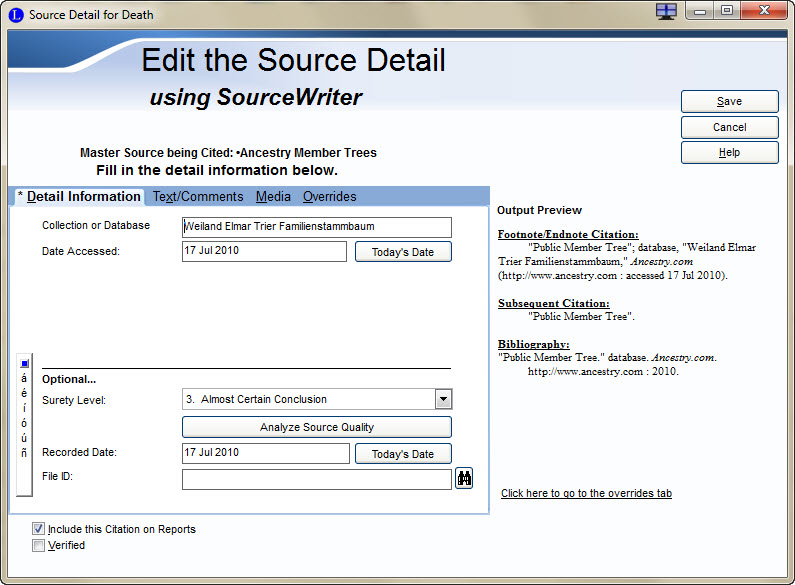
And added details for the particular tree I was referencing.

FamilyGroupDetailThe resulting citation is: “Public Member Tree”; database, “Weiland Elmar Trier Familienstammbaum,” Ancestry.com (http://www.ancestry.com : accessed 17 Jul 2010).

There were no “fields” to enter information about the author of the tree or the specific person of interest within the tree. If I added additional details to the “Collection or Database” field, they would appear within the double quotation marks with the name of the family tree.

Since the “Family Group Sheet” did not produce the desired results, I looked at the “Pedigree Chart” master source. Because this Master Source only had an option for medium of “Privately held” and not “Online database,” the citation it produced was lacking even more of the necessary data fields. I decided to use the Generic Source and the Online database medium.

SelectMasterSourceI filled in the Database Title, Format, Website Title, URL and Date accessed. Note that this access date will apply to any citation detail associated with this Master Source. GenericMasterSource-FamilyTree
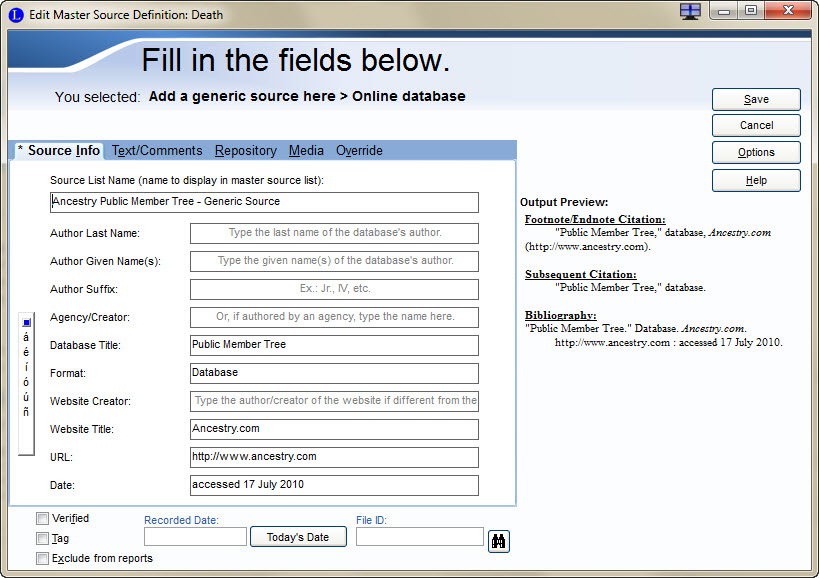
There are only two fields on the Source Detail screen to hold all the rest of the data for the citation, but at least I was able to place the data so that the resulting citation looked as it should.GenericDetail-FamilyTreeThe “Item of Interest” field contains: ‘ “Weiland Elmar Trier Familienstammbaum” family tree by Elmar Weiland, profile for Johann Georg Weiland (b. 1789 in Illingen-Genweiller, Saarland, German, d.1851 in Hocking County, Ohio, USA)’ That’s a lot of information for a single field.

The “Credit Line” field contains: “undocumented data updated March 2010”

My resulting citation is:

“Public Member Trees,” database, Ancestry.com (http://www.ancestry.com : accessed 17 Jul 2010), “Weiland Elmar Trier Familienstammbaum” family tree by Elmar Weiland, profile for Johann Georg Weiland (b. 1789 in Illingen-Genweiller, Saarland, German, d.1851 in Hocking County, Ohio, USA); undocumented data updated March 2010.

Conclusion:

  • By trying different SourceWriter Master Sources, I was able to build a citation that closely matched the model given
  • Much of the detail information was concatenated into the single “Item of Interest” field, not taking advantage of the convenience of SourceWriter
  • As mentioned above, the access date entered in the Master Source will need to be changed when citing other trees (or even this one) that were viewed on other days

So far, the bloggers have addressed the simpler case of undocumented data in a family tree. Who will be the first to tackle documented data?

——————————————————————

      1 Elizabeth Shown Mills, “Citing of an Ancestry Member Tree,” Evidence Explained, 4 April 2014 (https://www.evidenceexplained.com/content/citing-ancestry-member-tree : accessed 8 April 2014), #2.

URL for this post: http://www.bnk94.com/groupwgenealogy/2014/04/08/legacy-family-tree-8-source-citation-for-an-ancestry-com-public-member-tree/

Copyright (c) 2013, Beth Weiland Benko

Genealogy Software Comparison, Part 4b: More on Census Records – FTM

In the earlier post on RootsMagic (RM), I described the process to enter the transcription and image of a census record to its source citation.  I also l looked at how to share the census fact and source citation with the other family members included in the census record.  Today’s post will look at those same features in Family Tree Maker (FTM).

I added a census fact to Nicholas Huber in my tree by going to the Person tab in the People workspace and then clicking on the blue plus sign to add the fact.

I added the source citation following the process described in the earlier post Citing a Census Source – FTM.  The resulting Source Details are shown below.

I clicked on the “Resource Notes” tab and entered the information transcribed from the census record.  Next I went to the “Media” tab to link the census image.

I clicked on the “Attach New Media” button.  (If I had previously attached this census image to a source or individual in my FTM database, I would have clicked on the “Link to Existing Media” button.)  The “Select a Media Item” window allowed me to select the correct file from my hard drive.

Then, the “Copy to Media Folder” window appeared.

To save space in my FTM database (and thus on my hard drive), I chose the option to “Link to this file where it is (without copying it).”  I selected the “Census” category and then “OK.”  The Media Detail window allowed me to add a Caption, Date and Description to the image as well as to change the Category and mark the image Private.

After entering the desired data and clicking “OK” I now had my source citation with transcription and image of the source record.  Now, I wanted to attach all of this to the other three members of the family who appeared in this census record.

I searched all around on Nicholas’ Person tab (in the People workspace) trying to find the button or icon that would allow me to copy his 1910 census fact and source.  I couldn’t find any.  I looked unsuccessfully in the Companion Guide, the electronic book that comes with the software.  Next, I went to the Online Help Center and accessed the Knowledge Base.  I typed “copy fact” into the search box and saw several articles related to facts and to making backup copies of the database.  I started reading through all the articles and finally found what I was looking for in the article “Add, edit or delete a fact in Family Tree Maker.”  I followed the instructions very carefully and successfully copied the fact and source citation from one family member to the other three.  Here are the steps.

I went to the Person tab on the People workspace and right clicked on the fact for the 1910 census that I wanted to copy and selected “Copy.”

Then, I right clicked again on the same fact and selected “Paste.”   The “Paste Fact” window appeared and displayed Nicholas and his family members.

I selected the people to whom I wanted to copy the fact and source citation, namely Theresa, Ida and Clarence and I deselected Nicholas.

I read in the knowledge base that it is important to deselect the original person from whom the fact is copied.  Failure to do so will result in a duplicate fact being created for this person.  After I clicked “OK” to complete the copy/paste, I checked the facts for Theresa, Ida, and Clarence and saw they now had the 1910 census fact and the source citation.

In FTM, the process to add the image and transcription to a source citation was easy enough to do.  The screen flow was intuitive.  Copying the fact and source citation from one individual to others was somewhat more difficult.  It was not clear at first how to accomplish the operation.  Having to deselect the person whose fact was being copied in order to prevent undesired duplicates seems to indicate a poorly designed feature.  In the end, I managed to do what I wanted to do, but the procedure seemed too complicated.

The URL for this post is: http://www.bnk94.com/groupwgenealogy/2012/11/01/genealogy-software-comparison-part-4b-more-on-census-records-ftm/

Copyright (c) 2012, Beth Weiland Benko

Genealogy Software Comparison, Part 4a: More on Census Records – RM

Census records are fundamental to US genealogical research in 19th and early 20th centuries.  I like to think of the census records as a framework on which to build our ancestors’ full story.  If we manage to locate all the relevant census records, we are provided with decennial snapshots of our ancestral families.  We can then research other sources to fill in the details of the intervening years and produce a complete biography.

In Part 4 of this series, I will expand upon the entering of census data that I began in Part 3.  In earlier posts, I entered a census fact for an individual and examined the source citation that the program created.  I compared each citation to Evidence Explained to see how close they were to Elizabeth Shown Mills’ standard.  See the summary post for my conclusions.

Since a census record documents the individuals in a household, it is important to enter census data for everyone who was living together at the time of the census.  One would hope that the software programs would make it easy to replicate this data across all proper family members.  It is also desirable to include a transcription of the census data and link to the image of the census page.

This post will work with the 1910 census for Grandma Ida’s family.  In 1910 she was living with her parents, Nicholas and Theresa, and her younger brother Clarence.

Nicholas Huber Family in the 1910 Census

Starting with Nicholas Huber’s “Edit Person” window, I added the census fact for the 1910 census and the source citation.  I covered this procedure in the blog post Citing a Census Source – RM and will not repeat it here.  Here are the Master Source and Source Details for this census record.

Next, I clicked on the tab labeled “Detail text” and entered the transcription of the census record.

To add the image of the census record, I clicked on the “Media” tab, then on the “Add new media” button.  I selected the media type ( “Image” — could also be “File,” “Sound” or “Video”) and the location for the media.  This will be “Disk” because the image is on my computer.  Alternatively, I could use my scanner to get a digital copy of a photo.  After clicking “Disk” a Windows file picker appears so that I can select the right file.

After loading the image, RootsMagic displays the Media Properties window where I can enter relevant information such as caption, description, date, reference number.

This census image is now attached to the Source record for the census Fact.  Note that it is also possible to attach the census image to the Census Fact directly.  To do this, I would click the box under the small camera icon on the line corresponding to the Census Fact on the Edit Person screen. (See the red circle is in the picture below.  That area is blank before adding the image and contains a green check mark  after adding the image.) I don’t know that attaching the image to the fact is better or worse than attaching the image to the source for that fact.  In this case, I have done both.  This does not increase the size of my RM database significantly, because RM just stores a pointer to the image on my computer’s hard drive.

Now that the census fact is properly documented for Nicholas Huber, I’d like to add the same census fact to the other three family members.  To do this, I click on the 1910 census fact in Nicholas’ “Edit Person” window and then click on the “Share” button.

The “Select People” window allows me to choose the individuals who will share this census fact.

A review window allows me to review those who will share this fact and add or remove people as needed.  Note that people added here must already be in the database.  It is not possible to add a “new” person (e.g. the baby who shows up for the first time in this census or the newly found mother-in-law now living with the family) from this window.  In such cases, the new person should probably be added to the database before doing the fact sharing.

After I complete this operation by clicking “OK,” I can check to see that this 1910 census fact has been shared with the other family members.  Below is a snapshot of Grandma Ida’s facts.  The shared 1910 census fact has a special icon to indicate that it is shared.

The entering of the transcription and attaching an image to the census fact was easy to do.  RM makes it simple to share a census fact from one person with others in the database.

The URL for this post is: http://www.bnk94.com/groupwgenealogy/2012/10/30/genealogy-software-comparison-part-4a-more-on-census-records-rm/

Copyright (c) 2012, Beth Weiland Benko

Genealogy Software Comparison, Part 3d: Citing a Census Source – Summary

In the last few posts, I have reviewed adding a census source citation in RootsMagic (RM), Family Tree Maker (FTM), and Legacy Family Tree (LFT).  I will give a summary of my experiences below.

In order to provide a thorough analysis of each program’s capabilities, I am going to take a somewhat scholarly approach to the task of developing source citations.  First, it is necessary to clearly state some definitions.  Elizabeth Shown Mills has published single page quick sheet that summarizes the research process and defines the relevant terms.

SOURCES:  Artifacts or books, digital files, documents, films, people, recordings, websites, etc.

INFORMATION: Statements or raw data offered by a source.

EVIDENCE: INFORMATION that is relevant to the research problem.

SOURCES provide INFORMATION from which we select EVIDENCE for ANALYSIS.1

A Citation is a reference to the source, with details (e.g. page number). ”Citations are statements in which we identify our source or sources for a particular assertion.”  Citations appear in Source Lists (bibliographies) and in Reference Notes, either as footnotes or endnotes.  Each citation type has a specific format.2

All three programs use the concept of a master source and source detail (RM and LFT).  FTM uses the terms source and citation detail, but it is the same idea. This concept was very confusing to me the first time that I encountered it.  How does one know where the dividing line is between the master source and the source detail?

The answer is easy in the case of a book:  the source detail is the page number and everything else (author, title, publisher, etc.) is part of the master source.  Census records are a bit more complicated.  It is easy to assume that the year and type of census (e.g. “1920 United States Federal Census”) should be part of the master source and that sheet and page number, dwelling number, family number and person’s name should be in the source detail.  What about city/township, county, state and enumeration district?  I struggled with this for a while.

RootsMagic provides an excellent explanation of this concept in their free, online webinar:  “Sources, Citations and Documentation with RootsMagic” at http://files.rootsmagic.com/webinars/2011-02-04-Sources-Citations-and-Documentation-with-RootsMagic.mp4.  I recommend it for anyone who seeks clarity on this issue.

In each of the three programs, I entered a census “fact” or “event” for my grandparents using the 1920 census as my source.  I used a template in each program to construct a citation.  I compared the citation that each software program produced to a citation I built “by hand” using Evidence Explained as my reference.  Here are the results.

Family Tree Maker

1920 U.S. census, population schedule, Ohio, Hamilton County, Cincinnati, Ward 9, enumeration district (ED) 163, p. 232,  sheet 4A, dwelling 51, family 83, Ida T. Ulrich; NARA microfilm publication T625, roll 1390; digital image, Ancestry.com (http://www.ancestry.com).

RootsMagic

1920 U.S. census, Hamilton County, Ohio, population schedule, Cincinnati, Ward 9, enumeration district (ED) 163, p. 232 (stamped), sheet 4A, dwelling 51, family 83, Ida T. Ulrich; digital images, Ancestry.com (http://www.ancestry.com : accessed 17 September 2012); National Archives microfilm publication T625, roll 1390.

Legacy Family Tree

1920 U.S. census, Hamilton Co., Ohio, population schedule, Cincinnati, Ward 9, enumeration district (ED) 163, sheet 4A, p. 232 (stamped), dwelling 51, family 83, Ida T. Ulrich; digital images, Ancestry.com (http://www.ancestry.com : accessed 1 Oct 2012); citing National Archives and Records Administration microfilm T625, roll 1390.

Citation based on Evidence Explained3

1920 U.S. census, Hamilton County, Ohio, population schedule, Cincinnati, Ward 9, Enumeration District (ED) 163, p. 232 (stamped), sheet 4A, dwelling 51, family 83, Ida T. Ulrich; digital image, Ancestry.com (http://www.ancestry.com : accessed 1 October 2012); citing National Archives microfilm publication T625, roll 1390.

Conclusion

RM and LFT provided individual fields for each piece of data contained in the details of the citation.  Each field had help text to guide the user.  The citation produced by RM was identical to the citation I constructed by hand.  The LFT citation differed one small detail: sheet number was before page number instead of the other way around.  Both RM and LFT produce a Reference Note and Source List (bibliography) form of the citation.

FTM did not give field-by-field data entry for the detailed information.  It provided a single free-form text box for data entry along with help text enumerating the information to be entered.  This method puts added burden on the user to enter all the correct data.  In addition to being more prone to data entry errors, the resulting citation does not closely match the citation prescribed by Evidence Explained.  FTM produces only a Reference Note citation and not a Source List (or bibliography) form.

Based on my experience, the winner in the census record source citation category is RootsMagic, followed closely by Legacy Family Tree.  Family Tree Maker was a distant third as judged on ease of data entry and composition of the resulting citation.


1Elizabeth Shown Mills, Evidence Analysis: A Process Map; digital image at Historic Pathways (http://www.HistoricPathways.com : 10 October 2012.

2Elizabeth Shown Mills, Evidence Explained: Citing History Sources from Artifacts to Cyberspace, (Baltimore: Genealogical Publishing Co., 2007), 42-43.

3Ibid, 240.

Genealogy Software Comparison, Part 3c: Citing a Census Source – LFT

In preparation for delivering some help sessions at my local genealogical society, I am working to become proficient in three genealogy applications:  Family Tree Maker (FTM), RootsMagic  (RM) and Legacy Family Tree (LFT).  I will be using various features of each package and blogging about my experiences.  The “Part 3” posts will look at adding a source citation for a census record.  I will use RM in Part 3a; FTM in Part 3b; and LFT in Part 3c.  If you’d like to start at the beginning, the first post in the series is:  Genealogy Software Comparison.

In Legacy Family Tree, I went to the Individual’s Information for my Grandma Ida and clicked next to the item I wanted to source (e.g. the date next to the “Born” label).  Then I click the Source icon.  It looks like three books standing up (circled in green below).

This brings up the “Assigned Sources” for this individual.  From here, I clicked on the “Add a New Source” button.

Assigned Sources

I was brought to the “Add a New Master Source” screen, Step 1 within the SourceWriter wizard.  From here I chose “Census records” as the type of source.  I was prompted for country, type of census record, the year of the census and the medium.

Add New Master Source

I next went to Step 2 of the SourceWirter.  I filled in the Source List Name.  As the comment indicates, this is the name that will appear in the master list of sources.  It does not appear in the citation itself.  It should be descriptive and meaningful to the user.  After all, the user will need it in the future as a clue fo<4>r which master source to select.  I then filled in the remaining fields with the appropriate information.

Fill in Master Source information

Note that there is an “Output Preview” on the right hand side of this screen.  There are three flavors of citation: Footnote/Endnote, Subsequent and Bibliography (or Source List).  The preview allows the user to see the citations as they are built.  There are additional tabs on this screen to allow one to add comments, repository information, attach an image or to override or customize the Bibliography entry.

I saved this Master Source entry and moved to Step 3, Add the Source Detail.  On this screen, I entered the information in each of the individual fields.  After entering the Dwelling number, I needed to scroll down in order to enter Family Number, ID of Person and Date Accessed.  This is a minor inconvenience at best and results in an incomplete citation if the user fails to notice the scroll bar.  (I missed it my first time through this process.)

Enter Source DetailI saved this citation and was returned to the Individual’s Information screen for Grandma Ida.  The blue text on the label “Born” indicates that there is a source for this information.

The resulting citation is very close to that prescribed in Evidence Explained.  Page number is after sheet number instead of the other way around.  The words “enumeration district” are not capitalized.  The Oct/October difference is due to my data entry.  Garbage in / Garbage out!

LFT:  1920 U.S. census, Hamilton Co., Ohio, population schedule, Cincinnati, Ward 9, enumeration district (ED) 163, sheet 4A, p. 232 (stamped), dwelling 51, family 83, Ida T. Ulrich; digital images, Ancestry.com (http://www.ancestry.com : accessed 1 Oct 2012); citing National Archives and Records Administration microfilm T625, roll 1390.

EE: 1920 U.S. census, Hamilton County, Ohio, population schedule, Cincinnati, Ward 9, Enumeration District (ED) 163, p. 232 (stamped), sheet 4A, dwelling 51, family 83, Ida T. Ulrich; digital image, Ancestry.com (http://www.ancestry.com : accessed 1 October 2012); citing National Archives microfilm publication T625, roll 1390.

[1] Elizabeth Shown Mills, Evidence Explained: Citing History Sources from Artifacts to Cyberspace (Baltimore, Maryland: Genealogical Publishing Co., 2007), 240.

Genealogy Software Comparison, Part 3b: Citing a Census Source – FTM

In preparation for delivering some help sessions at my local genealogical society, I am working to become proficient in three genealogy applications:  Family Tree Maker (FTM), RootsMagic  (RM) and Legacy Family Tree (LFT).  I will be using various features of each package and blogging about my experiences.  The “Part 3” posts will look at adding a source citation for a census record.  I will use RM in Part 3a; FTM in Part 3b; and LFT in Part 3c.  If you’d like to start at the beginning, the first post in the series is:  Genealogy Software Comparison.

In the Person tab of the People Workspace, I clicked the plus sign to add the census fact to my grandma Ida.

FTM Add Census Fact

I entered the date and place of the census in the spaces provided.  Then, I added the source information, a “new” source.  On the “Add Source Citation For Census For <person>” screen, I clicked on the “New…” button to display the “Add Source” screen.

FTM - Add Source

I was a bit confused about what to do next until I clicked on the “More” button to display the “Select Source Template” screen.

FTM - Select Source Template

On that screen, I selected “Census Records” Source group, “Digital Images” Category and “Population Schedule – Untied States, 1790-1840 (by Census Year and Location)” template.  After clicking on “OK” I saw the following “Add Source” screen with appropriately labeled fields to fill in for my census citation.

FTM - Add Source

I completed this form and clicked OK again.  The “Add Source” window closed revealing the “Add Source Citation for Census for <person>” screen again.

FTM - Add Source Citation for Census

The Source title field was filled in with the information I had entered on the previous screen, i.e. “1920 U.S. Census, Ohio, Hamilton Co., …”   The citation detail box contained a daunting set of instructions for data to be entered there.  Luckily, the information was available in a tool tip as I typed in that text box.

FTM - Edit Source CitatioThe text box for entry of the citation details was not as user friendly as having the individual fields displayed.  This would also have given the program the opportunity to provide help for each field.  I would have expected the template to walk the user through the data entry field by field.  To see the source citation that the software builds, a user must go to the Reference Notes tab. The resulting source citation contained of the necessary elements, but was not exactly in the form prescribed in Evidence Explained [1].

FTM:  1920 U.S. census, population schedule, Ohio, Hamilton County, Cincinnati, Ward 9, enumeration district (ED) 163, p. 232 (stamped),  sheet 4A, dwelling 51, family 83, Ida T. Ulrich; NARA microfilm publication T625, roll 1390; digital image, Ancestry.com (http://www.ancestry.com).

EE: 1920 U.S. census, Hamilton County, Ohio, population schedule, Cincinnati, Ward 9, Enumeration District (ED) 163, p. 232 (stamped), sheet 4A, dwelling 51, family 83, Ida T. Ulrich; digital image, Ancestry.com (http://www.ancestry.com : accessed 17 September 2012); citing National Archives microfilm publication T625, roll 1390.

[1] Elizabeth Shown Mills, Evidence Explained: Citing History Sources from Artifacts to Cyberspace (Baltimore, Maryland: Genealogical Publishing Co., 2007), 240.

Genealogy Software Comparison, Part 3a: Citing a Census Source – RM

In preparation for delivering some help sessions at my local genealogical society, I am working to become proficient in three genealogy applications:  Family Tree Maker (FTM), RootsMagic  (RM) and Legacy Family Tree (LFT).  I will be using various features of each package and blogging about my experiences.  The “Part 3” posts will look at adding a source citation for a census record.  I will use RM in Part 3a; FTM in Part 3b; and LFT in Part 3c.  If you’d like to start at the beginning, the first post in the series is:
http://wp.me/p2BB2a-h
.

Census records are fundamental to searching for information on our ancestors.  I like to think of the every-10-year snapshot as a framework for our their lives, a skeleton upon which to hang stories and details that flesh out the family history.

I started with an image from Ancestry.com of the 1920 census for my grandma Ida and her husband Arthur.  The census was taken on 6 Jan 1920, less than a year after they were married.

1920 Census for Arthur & Ida T. UlrichClick on any image to see a larger view.

I added a “census” fact for Ida and entered the details on her Edit Person screen.  Then I clicked on the “Sources” button and then “Add new source” to enter the source citation.  I selected “Census, U. S. Federal (Online images)” from the extensive list of source types.  When I selected a particular source type, the right hand panel displayed an explanation of that type of source and gave a reference to Elizabeth Shown Mills’ book Evidence Explained (EE) and sometimes a reference to her QuickSheet Citing Online Historical Resources (QC). (See the green box I put around this reference in the picture below.) This is wonderful information for the genealogist who is serious about source citations.

RM

After I selected the desired source type and clicked OK, I entered the Master Source and Detail information on the Edit Source screen.  The screen had a field for each desired or required field, along with help text in each field.These fields are specific to the source type selected, so that a user sees only what is needed for each type of source.

RM - Master SourceAs I entered each piece of information into the screen, the resulting source citation appeared on the right hand side in the three formats: Footnote, Short Footnote and Bibliography (or Source List).  Below is the Edit Source with all the pertinent data entered.

RM - Eidt Source

The resulting source citation (Footnote) for Ida and Arthur’s entry in the 1920 census is: “1920 U.S. census, Hamilton County, Ohio, population schedule, Cincinnati, Ward 9, enumeration district (ED) 163, p. 232 (stamped), sheet 4A, 51, family 83, Ida T. Ulrich; digital images, Ancestry.com (http://www.ancestry.com : accessed 17 September 2012); National Archives microfilm publication T625, roll 1390.”

This is the citation I was hoping for and it agrees with EE p. 240 and the example given on QC’s cover page, as promised.  It was easy to follow the screen flow and the field help to construct the source citation desired.

Next:  The same exercise using Family Tree Maker (FTM).


Genealogy Software Comparison, Part 2c: Starting a Family Tree – LFT

In preparation for delivering some help sessions at my local genealogical society, I am working to become proficient in three genealogy applications:  Family Tree Maker (FTM), RootsMagic  (RM) and Legacy Family Tree (LFT).   I used an early version of FTM in the late 90’s and I’ve been a user of LFT since 2008.  RM is completely new to me.   RootsMagic and Legacy FamilyTree offer a free version of their software with a limited set of features.  Since FTM does not have a similar free option, I decided to use the paid versions of each software package. This series of blogs will document my impressions of and experiences with these three software packages.

In this post, I review the process of creating a family tree file and entering a bit of data in Legacy Family Tree.  I entered a snippet of the maternal side of my family tree:  my grandmother, her husband and her parents.  For each person, I entered dates and places for birth, marriage, death and burial.

Legacy Family Tree, version 7.5.0.201 – www.legacyfamilytree.com

I started the Legacy Family Tree application.  Since I have used LFT for my research data, it opened my family database.  I clicked on “File” and then selected “New Family File…”

LFT = New Family FileThe Legacy Guided Setup Wizard walked me through the steps to begin a create file.  I was offered the option to start from scratch, import information from another genealogy program, open an existing Legacy file or open the sample family file that comes with Legacy.

If the user self-identifies as a  member of the LDS church, there is an option to sign into FamilySearch to download information on user and ancestors.   Next, the wizard presented an initial data entry screen.

I did not enter anything here because I was not starting with myself.   After I clicked on “Finished”, I was  able to name my file and select a directory to store it in on my hard drive.

Then I was presented with the following screen with lots of blank fields.    I confirmed that this is the same screen that I would have gotten if I had selected “No” above.

Since I knew how Legacy worked, I knew to add my grandmother’s name into the first field in the large box labeled “Female.”  I suppose it would have been better if I had entered Grandma Ida’s information into the fields for “my” data in the previous screen.

This all blank screen may be a bit daunting to a first time user.   However, I believe that most users would have entered their information on the last Wizard screen, so they would not have seen this totally blank screen.

Below is Grandma Ida’s information.

Below is the family view for Grandma Ida, her spouse and her parents.  This is the LFT default view.   It is possible to change the five fields displayed (birth, christening, death, burial and cause of death) by right clicking on one of the five labels.  It is simple to do, but not as obvious as the “Customize View” button in FTM.   Other views available are Pedigree, Descendent and Chronology.

Summary

All of the programs were relatively easy to use for basic data entry.  LFT may not be as intuitive as the others.  The wizard did include the “Watch Legacy Tour” button, but the object of this exercise was to enter some basic data without peaking at any Help or Tutorial, so I bypassed the tour.

Next time:  Entering a source citation for a census

Genealogy Software Comparison, Part 2b: Starting a Family Tree – FTM

In preparation for delivering some help sessions at my local genealogical society, I am working to become proficient in three genealogy applications:  Family Tree Maker (FTM), RootsMagic  (RM) and Legacy Family Tree (LFT).   I used an early version of FTM in the late 90’s and I’ve been a user of LFT since 2008.  RM is completely new to me.   RootsMagic and Legacy FamilyTree offer a free version of their software with a limited set of features.  Since FTM does not have a similar free option, I decided to use the paid versions of each software package. This series of blogs will document my impressions of and experiences with these three software packages.

In this post I will review creating a family tree file and entering a bit of data in Family Tree Maker.  I entered a snippet of the maternal side of my family tree:  my grandmother, her husband and her parents.  For each person, I entered dates and places for birth, marriage, death and burial.

Family Tree Maker, version 21.0.0.580 – www.familytreemaker.com

I started the program and chose the “Enter what you know” option.  I entered Ida’s name.  After I entered her last name, the program automatically put that name into the “New tree name” field.  Since that was not what I wanted, I was glad that it allowed me to change the database name as well as select the location where the file would be stored.   A place names lists is already populated (similar to what I had seen on Ancestry.com), so the first time I began to type Cincinnati, there was a list that I could select from.  Subsequently, the list just contained the place names I had entered.

The workflow of FTM encouraged me to enter parents’ names before I entered any additional detailed information for Grandma Ida.

FTM New Tree

After I entered information on the initial screen, I was given the option to allow Family Tree Maker to search Ancestry[.com] automatically.  I chose “No.”  After I clicked on “OK” the following screen came up, where I was able to enter death and marriage information for Ida.

The Custom View button near the bottom of the screen allowed me to add the fields for Burial information to this initial data entry screen.

Entering the cemetery name after the city resulted in an error icon after the burial place name, so I removed the cemetery name from the location field.  I did not see a way to attach the name of the cemetery to the burial event.

Entering the additional detailed information for Ida’s parents and husband was simple and intuitive.  The family tree view made it easy to navigate from one person to another.  Since I’ve been a user of Ancestry.com for several years and FTM bears a strong resemblance to that web site, the user interface feels very familiar.

Here is a summary of the information entered.


Summary

Family Tree Maker was easy to use for initial data entry.  The screens were very intuitive.  I never had to search around for how to enter the next person’s information.  One possible disappointment is the lack of a place to enter cemetery information on the burial event.

Next time:  Data entry in Legacy Family Tree

Genealogy Software Comparison, Part 2a: Starting a Family Tree – RM

In preparation for delivering some help sessions at my local genealogical society, I am working to become proficient in three genealogy applications:  Family Tree Maker (FTM), RootsMagic  (RM) and Legacy Family Tree (LFT).   I used an early version of FTM in the late 90’s and I’ve been a user of LFT since 2008.  RM is completely new to me.   RootsMagic and Legacy FamilyTree offer a free version of their software with a limited set of features.  Since FTM does not have a similar free option, I decided to use the paid versions of each software package. This series of blogs will document my impressions of and experiences with these three software packages.

This post will review creating a family tree file and entering a bit of data in RootsMagic.  Subsequent posts will review the same process in Family Tree Maker and Legacy Family Tree.  I entered a snippet of the maternal side of my family tree:  my grandmother, her husband and her parents.  For each person, I entered dates and places for birth, marriage, death and burial.

RootsMagic, version 5.0.4.1 – www.rootsmagic.com

I started the RootsMagic application and chose the option to create a new file.  I enter file name (RM-test) and choose the location on my hard drive for the data file.  I started tree with Ida Theresa Huber , my maternal grandmother.  I entered her birth date and then her birth place as “Cincinnati, Hamilton Co., Ohio, USA.  I am in the habit of putting “Co.” after the name of the county.  Experienced genealogists would recognize the leading comma in “, Hamilton, Ohio, USA” as a placeholder for the missing city name.  Others may mistake the comma as a typo and interpret the location to be the city of Hamilton, Ohio.  Thus, my preference is to put the “Co.” after the county name.

However, this practice triggered County Check in RM.

I decided that I would like the benefit of county check so I gave up “Co.” after the county name and accepted the alternative offered.  I also clicked on “More Info” and saw some historical information on the Hamilton County.  I was also offered “Online Info” button which took me to the FamilySearch Wiki page for Hamilton County, Ohio, and “Online Map” which took me to a historical map where I could enter the date and see the configuration of Ohio counties on that date.  This is a site that will be very useful in determining the correct locations for ancestral events.

Locations are remembered in the software.  The user only needs to begin typing and then select the proper location from the list of previously entered locations.  As there are usually many events that take place in each location, this saves typing and helps eliminate typos – provided one is careful the first time.

I added my grandmother and her parents.  The workflow was very intuitive.  I added her father, then her mother, then their marriage information.  I then entered a marriage event for my grandmother.  I was prompted to enter a new person or select an existing person as her spouse.

When I entered the burial location for each individual, there was just a single text entry field.  I typed the name of the cemetery in parentheses after the city name.

I reviewed the person’s information and noticed that there is a field called “Place details” that might more appropriately contain the name of the cemetery.

I changed the entry for the burial location, separating the cemetery name from city, county, state and country information.  I think the resulting sentence reads more naturally now.

Overall, the initial data entry experience with RM was very intuitive and logical.  I especially liked that I could easily navigate to historical county information in just a couple of “clicks.”


Summary

RootsMagic was relatively easy to use for basic data entry.  The program led me through the input process for the four family members in a way that was logical and intuitive.

Next time:  Data entry in Family Tree Maker