Genealogy Software Comparison, Part 4a: More on Census Records – RM

Census records are fundamental to US genealogical research in 19th and early 20th centuries.  I like to think of the census records as a framework on which to build our ancestors’ full story.  If we manage to locate all the relevant census records, we are provided with decennial snapshots of our ancestral families.  We can then research other sources to fill in the details of the intervening years and produce a complete biography.

In Part 4 of this series, I will expand upon the entering of census data that I began in Part 3.  In earlier posts, I entered a census fact for an individual and examined the source citation that the program created.  I compared each citation to Evidence Explained to see how close they were to Elizabeth Shown Mills’ standard.  See the summary post for my conclusions.

Since a census record documents the individuals in a household, it is important to enter census data for everyone who was living together at the time of the census.  One would hope that the software programs would make it easy to replicate this data across all proper family members.  It is also desirable to include a transcription of the census data and link to the image of the census page.

This post will work with the 1910 census for Grandma Ida’s family.  In 1910 she was living with her parents, Nicholas and Theresa, and her younger brother Clarence.

Nicholas Huber Family in the 1910 Census

Starting with Nicholas Huber’s “Edit Person” window, I added the census fact for the 1910 census and the source citation.  I covered this procedure in the blog post Citing a Census Source – RM and will not repeat it here.  Here are the Master Source and Source Details for this census record.
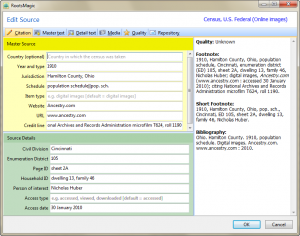
Next, I clicked on the tab labeled “Detail text” and entered the transcription of the census record.

To add the image of the census record, I clicked on the “Media” tab, then on the “Add new media” button.  I selected the media type ( “Image” — could also be “File,” “Sound” or “Video”) and the location for the media.  This will be “Disk” because the image is on my computer.  Alternatively, I could use my scanner to get a digital copy of a photo.  After clicking “Disk” a Windows file picker appears so that I can select the right file.
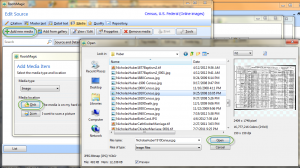
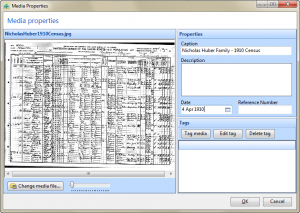
After loading the image, RootsMagic displays the Media Properties window where I can enter relevant information such as caption, description, date, reference number.
This census image is now attached to the Source record for the census Fact.  Note that it is also possible to attach the census image to the Census Fact directly.  To do this, I would click the box under the small camera icon on the line corresponding to the Census Fact on the Edit Person screen. (See the red circle is in the picture below.  That area is blank before adding the image and contains a green check mark  after adding the image.) I don’t know that attaching the image to the fact is better or worse than attaching the image to the source for that fact.  In this case, I have done both.  This does not increase the size of my RM database significantly, because RM just stores a pointer to the image on my computer’s hard drive.

Now that the census fact is properly documented for Nicholas Huber, I’d like to add the same census fact to the other three family members.  To do this, I click on the 1910 census fact in Nicholas’ “Edit Person” window and then click on the “Share” button.
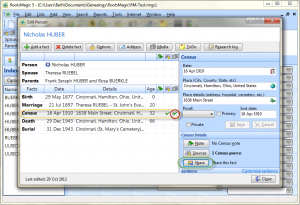
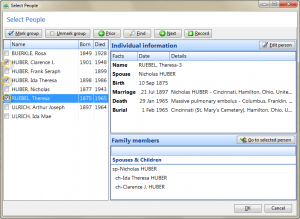
The “Select People” window allows me to choose the individuals who will share this census fact.

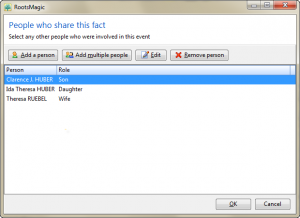
A review window allows me to review those who will share this fact and add or remove people as needed.  Note that people added here must already be in the database.  It is not possible to add a “new” person (e.g. the baby who shows up for the first time in this census or the newly found mother-in-law now living with the family) from this window.  In such cases, the new person should probably be added to the database before doing the fact sharing.

After I complete this operation by clicking “OK,” I can check to see that this 1910 census fact has been shared with the other family members.  Below is a snapshot of Grandma Ida’s facts.  The shared 1910 census fact has a special icon to indicate that it is shared.
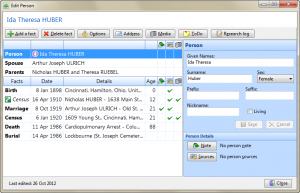
The entering of the transcription and attaching an image to the census fact was easy to do.  RM makes it simple to share a census fact from one person with others in the database.

The URL for this post is: http://www.bnk94.com/groupwgenealogy/2012/10/30/genealogy-software-comparison-part-4a-more-on-census-records-rm/

Copyright (c) 2012, Beth Weiland Benko

Genealogy Software Comparison, Part 3d: Citing a Census Source – Summary

In the last few posts, I have reviewed adding a census source citation in RootsMagic (RM), Family Tree Maker (FTM), and Legacy Family Tree (LFT).  I will give a summary of my experiences below.

In order to provide a thorough analysis of each program’s capabilities, I am going to take a somewhat scholarly approach to the task of developing source citations.  First, it is necessary to clearly state some definitions.  Elizabeth Shown Mills has published single page quick sheet that summarizes the research process and defines the relevant terms.

SOURCES:  Artifacts or books, digital files, documents, films, people, recordings, websites, etc.

INFORMATION: Statements or raw data offered by a source.

EVIDENCE: INFORMATION that is relevant to the research problem.

SOURCES provide INFORMATION from which we select EVIDENCE for ANALYSIS.1

A Citation is a reference to the source, with details (e.g. page number). ”Citations are statements in which we identify our source or sources for a particular assertion.”  Citations appear in Source Lists (bibliographies) and in Reference Notes, either as footnotes or endnotes.  Each citation type has a specific format.2

All three programs use the concept of a master source and source detail (RM and LFT).  FTM uses the terms source and citation detail, but it is the same idea. This concept was very confusing to me the first time that I encountered it.  How does one know where the dividing line is between the master source and the source detail?

The answer is easy in the case of a book:  the source detail is the page number and everything else (author, title, publisher, etc.) is part of the master source.  Census records are a bit more complicated.  It is easy to assume that the year and type of census (e.g. “1920 United States Federal Census”) should be part of the master source and that sheet and page number, dwelling number, family number and person’s name should be in the source detail.  What about city/township, county, state and enumeration district?  I struggled with this for a while.

RootsMagic provides an excellent explanation of this concept in their free, online webinar:  “Sources, Citations and Documentation with RootsMagic” at http://files.rootsmagic.com/webinars/2011-02-04-Sources-Citations-and-Documentation-with-RootsMagic.mp4.  I recommend it for anyone who seeks clarity on this issue.

In each of the three programs, I entered a census “fact” or “event” for my grandparents using the 1920 census as my source.  I used a template in each program to construct a citation.  I compared the citation that each software program produced to a citation I built “by hand” using Evidence Explained as my reference.  Here are the results.

Family Tree Maker

1920 U.S. census, population schedule, Ohio, Hamilton County, Cincinnati, Ward 9, enumeration district (ED) 163, p. 232,  sheet 4A, dwelling 51, family 83, Ida T. Ulrich; NARA microfilm publication T625, roll 1390; digital image, Ancestry.com (http://www.ancestry.com).

RootsMagic

1920 U.S. census, Hamilton County, Ohio, population schedule, Cincinnati, Ward 9, enumeration district (ED) 163, p. 232 (stamped), sheet 4A, dwelling 51, family 83, Ida T. Ulrich; digital images, Ancestry.com (http://www.ancestry.com : accessed 17 September 2012); National Archives microfilm publication T625, roll 1390.

Legacy Family Tree

1920 U.S. census, Hamilton Co., Ohio, population schedule, Cincinnati, Ward 9, enumeration district (ED) 163, sheet 4A, p. 232 (stamped), dwelling 51, family 83, Ida T. Ulrich; digital images, Ancestry.com (http://www.ancestry.com : accessed 1 Oct 2012); citing National Archives and Records Administration microfilm T625, roll 1390.

Citation based on Evidence Explained3

1920 U.S. census, Hamilton County, Ohio, population schedule, Cincinnati, Ward 9, Enumeration District (ED) 163, p. 232 (stamped), sheet 4A, dwelling 51, family 83, Ida T. Ulrich; digital image, Ancestry.com (http://www.ancestry.com : accessed 1 October 2012); citing National Archives microfilm publication T625, roll 1390.

Conclusion

RM and LFT provided individual fields for each piece of data contained in the details of the citation.  Each field had help text to guide the user.  The citation produced by RM was identical to the citation I constructed by hand.  The LFT citation differed one small detail: sheet number was before page number instead of the other way around.  Both RM and LFT produce a Reference Note and Source List (bibliography) form of the citation.

FTM did not give field-by-field data entry for the detailed information.  It provided a single free-form text box for data entry along with help text enumerating the information to be entered.  This method puts added burden on the user to enter all the correct data.  In addition to being more prone to data entry errors, the resulting citation does not closely match the citation prescribed by Evidence Explained.  FTM produces only a Reference Note citation and not a Source List (or bibliography) form.

Based on my experience, the winner in the census record source citation category is RootsMagic, followed closely by Legacy Family Tree.  Family Tree Maker was a distant third as judged on ease of data entry and composition of the resulting citation.


1Elizabeth Shown Mills, Evidence Analysis: A Process Map; digital image at Historic Pathways (http://www.HistoricPathways.com : 10 October 2012.

2Elizabeth Shown Mills, Evidence Explained: Citing History Sources from Artifacts to Cyberspace, (Baltimore: Genealogical Publishing Co., 2007), 42-43.

3Ibid, 240.

Genealogy Software Comparison, Part 3c: Citing a Census Source – LFT

In preparation for delivering some help sessions at my local genealogical society, I am working to become proficient in three genealogy applications:  Family Tree Maker (FTM), RootsMagic  (RM) and Legacy Family Tree (LFT).  I will be using various features of each package and blogging about my experiences.  The “Part 3” posts will look at adding a source citation for a census record.  I will use RM in Part 3a; FTM in Part 3b; and LFT in Part 3c.  If you’d like to start at the beginning, the first post in the series is:  Genealogy Software Comparison.

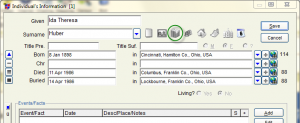
In Legacy Family Tree, I went to the Individual’s Information for my Grandma Ida and clicked next to the item I wanted to source (e.g. the date next to the “Born” label).  Then I click the Source icon.  It looks like three books standing up (circled in green below).

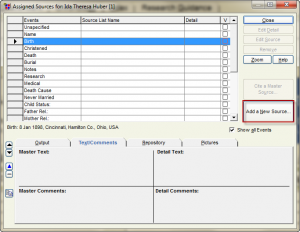
This brings up the “Assigned Sources” for this individual.  From here, I clicked on the “Add a New Source” button.

Assigned Sources

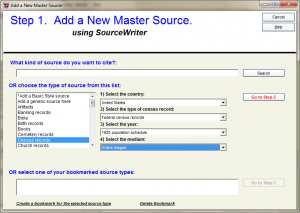
I was brought to the “Add a New Master Source” screen, Step 1 within the SourceWriter wizard.  From here I chose “Census records” as the type of source.  I was prompted for country, type of census record, the year of the census and the medium.

Add New Master Source

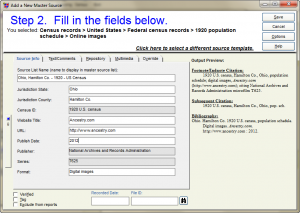
I next went to Step 2 of the SourceWirter.  I filled in the Source List Name.  As the comment indicates, this is the name that will appear in the master list of sources.  It does not appear in the citation itself.  It should be descriptive and meaningful to the user.  After all, the user will need it in the future as a clue fo<4>r which master source to select.  I then filled in the remaining fields with the appropriate information.

Fill in Master Source information

Note that there is an “Output Preview” on the right hand side of this screen.  There are three flavors of citation: Footnote/Endnote, Subsequent and Bibliography (or Source List).  The preview allows the user to see the citations as they are built.  There are additional tabs on this screen to allow one to add comments, repository information, attach an image or to override or customize the Bibliography entry.

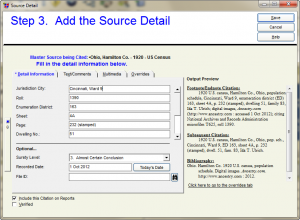
I saved this Master Source entry and moved to Step 3, Add the Source Detail.  On this screen, I entered the information in each of the individual fields.  After entering the Dwelling number, I needed to scroll down in order to enter Family Number, ID of Person and Date Accessed.  This is a minor inconvenience at best and results in an incomplete citation if the user fails to notice the scroll bar.  (I missed it my first time through this process.)

Enter Source DetailI saved this citation and was returned to the Individual’s Information screen for Grandma Ida.  The blue text on the label “Born” indicates that there is a source for this information.

The resulting citation is very close to that prescribed in Evidence Explained.  Page number is after sheet number instead of the other way around.  The words “enumeration district” are not capitalized.  The Oct/October difference is due to my data entry.  Garbage in / Garbage out!

LFT:  1920 U.S. census, Hamilton Co., Ohio, population schedule, Cincinnati, Ward 9, enumeration district (ED) 163, sheet 4A, p. 232 (stamped), dwelling 51, family 83, Ida T. Ulrich; digital images, Ancestry.com (http://www.ancestry.com : accessed 1 Oct 2012); citing National Archives and Records Administration microfilm T625, roll 1390.

EE: 1920 U.S. census, Hamilton County, Ohio, population schedule, Cincinnati, Ward 9, Enumeration District (ED) 163, p. 232 (stamped), sheet 4A, dwelling 51, family 83, Ida T. Ulrich; digital image, Ancestry.com (http://www.ancestry.com : accessed 1 October 2012); citing National Archives microfilm publication T625, roll 1390.

[1] Elizabeth Shown Mills, Evidence Explained: Citing History Sources from Artifacts to Cyberspace (Baltimore, Maryland: Genealogical Publishing Co., 2007), 240.